UX Hardware Prototyping – a test system undertaken in 3 steps
UX hardware prototyping works perfectly, if well planned
Ergonomic factors play an important role concerning the development of kiosk and terminal systems. In which height is the display attached? What about the slope? Where are important devices for input and output located? Is the user familiar with the positioning of single elements? In order to be able to answer these questions, we tried our luck in hardware prototyping. Step by step towards a testable prototype.
Step by step towards a hardware prototype
This Video shows, how the hardware prototype for the kiosk got built.
Normally within kiosk systems, users need to solve their tasks on their own. A well-performed handling is mandatory. The interaction of hard- and software is a very essential part and needs to be tested within the user-centred design process. For this reason, it is helpful to create a software prototype and a hardware prototype. Both prototypes will be evaluated in a well-founded usability test. The compliance to ergonomic guidelines alone is no guarantee for a functioning system. Therefore, we would like to give you an insight in how we build our kiosk prototype.
Step 1: Well begun is half done
There is a risk that the creation of a hardware prototype can be very time-consuming. Basically, a prototype should represent reality in the best possible way. To avoid an expensive and time-consuming development process, there need to be a focus on the relevant aspects. In our case, we build up a simplified 3D model based on CAD data.
The shape itself was a bit simplified without changing the general proportions, a scale of one to one was kept. All elements need to be placed where they are to find later on. There is no need to put emphasis on aesthetical refinements as long as they do not influence the ergonomics.
The number of utilized wood thickness resp. bar thickness should be as little as possible. For our prototype, we used two types of wood thickness (19mm and 4mm fiberboards) and three different screws. Besides this, it was also necessary to define design constraints like e.g. that we can only use square wooden plates.
Step 2: Sustainable basis of the hardware prototype
The basis consists of 19mm fiberboards which have been glued and screwed together. Sidewalls and shelfs as core elements. To complete the outer edges and to function as support of the light-weight foamboards wooden strips were utilized.
The touchscreen itself is just an improvisation but very stable concerning a possible interaction. Within the planning process of the hardware prototype we did not focus on details but a stable wooden area was included. This leads to a faster result.
The front of the kiosk system was clad in paperback light-weight foamboards. As this is a material which is used very often by architectures to build models. The advantages of this material are that it can be trimmed easily, that it looks proper and that it has a high life expectancy. We only used paint for areas which were not covered by carton. As mentioned before, there is no emphasis on perfection but on functionality.
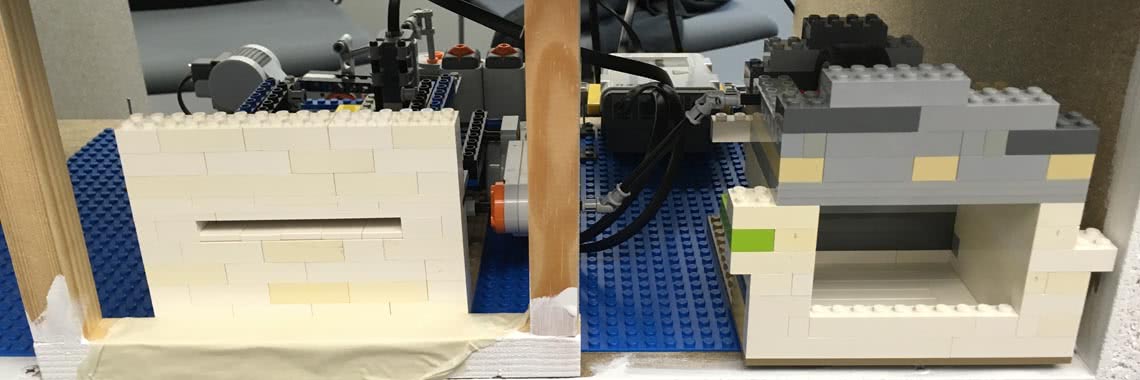
Step 3: Technology with Danish nubs
For the later planned usability test, we also needed to simulate the output of receipt and cash. For this simulation, we decided to utilize LEGO Mindstorms. Traditional bricks had been used to construct a container for change as well as an output slot for paper money. The nubs had been hidden in order to not distract users during the user tests later on.
The technology inside the kiosk system was realized by using LEGO Technology in a simple and straight manner. To put a coin on a rubber tire works simple and reliable. As soon as the engine is moving the tire, the coin is falling precisely into the output slot.
The programming of the sequence control was realized with the software of LEGO. The activation of the control is made by the test coordinator who needs to press a hidden button. In general, it would be possible to connect the programming with the hardware prototype via touch screen. We did not realize it for the usability test because it was not necessary.
Conclusion: From planning to success
A good planning of features needed for the UX prototype’s usability test is one of the keys to success. The combination of limited resources and 3D planning has led to the desired, ready-for-use result in a very short period of time. The fact remains: Everything can be built with LEGO :-)!
We are looking forward to our next manual prototype project. Please, contact Christian Bechinie.